For any runner, from the weekend warrior to the marathon veteran, running shoes are the single most critical piece of equipment. Yet, many of us are guilty of neglecting them, allowing mud, sweat, and grime to accumulate until performance suffers or odors become unbearable. The solution is simple: clean your shoes. However, the wrong method can cause irreversible damage, shortening the lifespan of your expensive gear. The definitive, science-backed way to clean your running shoes involves a gentle hand-wash using mild soap and a soft brush, followed by a patient air-dry process away from direct heat, ensuring you protect the delicate foams, adhesives, and fabrics that are crucial for support and cushioning.
Why Proper Cleaning Matters More Than You Think
It’s easy to view a dirty shoe as a badge of honor—a sign of miles logged and trails conquered. While that sentiment is understandable, letting dirt and sweat linger is actively detrimental to your footwear and, potentially, your health.
Dirt, grit, and mud are abrasive. As these particles work their way into the mesh upper of your shoe, they act like fine-grit sandpaper, slowly breaking down the fibers with every step and flex of your foot. This leads to premature tears and a loss of structural integrity in the upper, which is designed to hold your foot securely in place.
Furthermore, sweat and moisture create a breeding ground for bacteria and fungus inside your shoe. This not only leads to unpleasant odors but can also contribute to skin issues like athlete’s foot. The salt from your sweat can also degrade fabrics and foams over time, making them brittle.
Most importantly, proper cleaning preserves the advanced technology you paid for. Modern running shoe midsoles are crafted from sophisticated EVA or TPU foams designed for optimal energy return and shock absorption. Exposing these materials to harsh cleaning methods can compromise their cellular structure, permanently reducing their cushioning ability and protective qualities.
The Cardinal Sins of Shoe Cleaning: What to Avoid at All Costs
Before we detail the correct method, it’s crucial to understand what not to do. These common mistakes are the fastest way to ruin a perfectly good pair of running shoes, turning a hundred-dollar investment into a worthless piece of rubber and fabric.
The Washing Machine: A Recipe for Disaster
Tossing your running shoes into the washing machine might seem like an easy fix, but it’s a destructive act. The combination of prolonged water submersion, the tumbling agitation of the wash cycle, and the water temperature (even on a cold setting) can be catastrophic.
The high-performance adhesives used to bond the outsole, midsole, and upper are not designed to withstand this environment. The process can cause them to weaken and delaminate, leading to parts of your shoe literally falling apart. The tumbling action can also warp the shape of the shoe and damage delicate overlays or welded-on support structures.
The Clothes Dryer: The Ultimate Shoe Destroyer
If the washing machine is a disaster, the clothes dryer is the apocalypse for your running shoes. The intense, direct heat is the sworn enemy of every component in your shoe. It will melt the glues, causing the sole to separate from the upper.
Heat also causes the specialized midsole foams to shrink, warp, and harden, completely destroying their cushioning properties. The shoe that emerges will not only be damaged but will also fit differently and offer a fraction of the support it once did, significantly increasing your risk of injury.
Harsh Chemicals: Bleach and Abrasive Cleaners
Reaching for household cleaners like bleach or abrasive powders is another critical error. Bleach will discolor and weaken the shoe’s upper materials, particularly the colorful synthetic fabrics. Abrasive cleaners can scratch and damage the smooth surfaces of the midsole and any protective coatings on the shoe.
Stick to mild, pH-neutral soaps or cleaners specifically formulated for athletic footwear. These are designed to lift dirt and grime without degrading the sensitive materials that make your shoes work.
The Definitive Guide: A Step-by-Step Method for Hand-Washing
Now that you know what to avoid, here is the safe, effective, and editor-approved method for restoring your shoes to their former glory. It requires a little patience, but the results are well worth the effort.
Step 1: Gather Your Supplies
Having everything ready beforehand makes the process smooth and efficient. You don’t need much, and you likely have most of these items at home already.
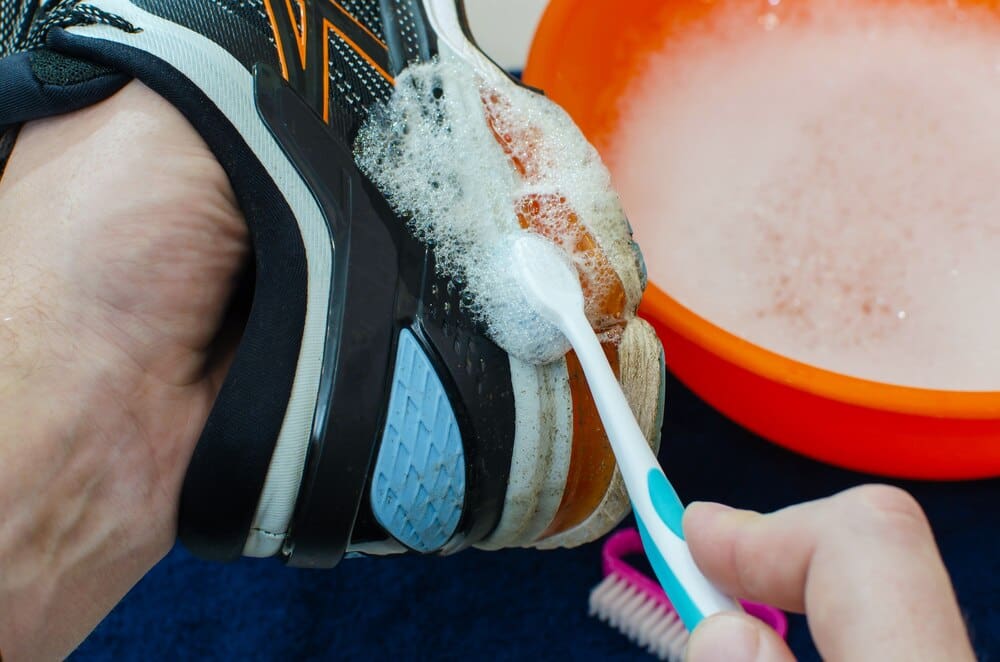
You will need: a bowl of lukewarm water, a mild soap (like dish soap or liquid laundry detergent), a soft-bristled brush (a vegetable brush or a dedicated shoe brush works well), an old toothbrush for details, and a couple of clean, dry microfiber towels or rags. Avoid using bar soap, as it can leave a residue.
Step 2: Preparation and Disassembly
First, find a suitable workspace, like a utility sink or an outdoor area you don’t mind getting a bit dirty. Begin by removing the shoelaces and the insoles (if they are removable). This allows you to clean each component thoroughly and ensures all parts dry properly.
Next, knock the shoes together to dislodge any large, loose clumps of dirt or mud. You can also use your soft brush (while dry) to sweep away any surface-level dust and debris. This prevents you from just turning dry dirt into mud once you add water.
Step 3: Cleaning the Uppers
Mix a small amount of your mild soap into the bowl of lukewarm water until it’s slightly sudsy. Dip your soft-bristled brush into the soapy water and gently scrub the shoe’s upper, including the tongue and heel collar. Use small, circular motions.
The key here is to be gentle. You are trying to lift the dirt out of the fabric, not scrub it into oblivion. For more delicate mesh areas, you might even use a microfiber cloth instead of a brush. Once clean, use a separate, water-dampened microfiber towel to wipe away any soap residue.
Step 4: Tackling the Midsole and Outsole
The midsole and outsole are far more durable than the upper, so you can be a bit more aggressive here. This is where the old toothbrush comes in handy. Dip the toothbrush in your soapy water and scrub the rubber and foam surfaces.
Pay special attention to the outsole grooves, where small rocks and stubborn grime accumulate. The toothbrush is perfect for getting into these tight spaces. After scrubbing, wipe the entire sole unit clean with your damp microfiber towel.
Step 5: Washing the Laces and Insoles
Don’t forget the parts you removed. The insoles can be gently scrubbed with the same soapy water solution and a soft brush. Be sure to rinse them thoroughly to remove all soap, as leftover residue can irritate your skin. Gently squeeze out excess water, but do not wring or twist them, as this can damage their shape.
Shoelaces can be washed in a few ways. You can submerge and agitate them in the bowl of soapy water and then rinse, or for a deeper clean, place them in a small mesh laundry bag and toss them in with your next load of laundry.
The Art of Drying: Patience is a Virtue
Properly drying your shoes is just as important as properly washing them. Rushing this step with heat is what causes the most significant damage. You must allow them to air-dry completely.
The Right Way: Air-Drying with Proper Technique
To begin, stuff the shoes with crumpled-up newspaper or absorbent paper towels. This serves two critical purposes: it helps absorb moisture from the inside of the shoe, speeding up the drying time, and it helps the shoe maintain its proper shape as it dries.
Place the stuffed shoes, along with the insoles and laces, in a dry, well-ventilated area. Keep them out of direct sunlight, as UV rays can degrade and fade the materials over time. Also, keep them away from any direct heat source like a radiator, heating vent, or fireplace.
You may need to replace the newspaper or paper towels every few hours if the shoes were particularly saturated. This will dramatically accelerate the process.
How Long Does It Take?
Patience is paramount. Depending on the humidity and airflow in your home, it can take anywhere from 12 to 24 hours, or even longer, for a pair of running shoes to dry completely. Do not be tempted to wear them before they are fully dry, as this can stretch the materials and promote mildew growth.
How Often Should You Clean Your Shoes?
There is no magic number for cleaning frequency. The best approach is to clean them on an as-needed basis. If you finish a particularly muddy trail run, it’s wise to clean them that day before the mud hardens.
For road runners, a deep clean might only be necessary every month or two, or whenever you notice they are visibly soiled or developing an odor. Regular spot-cleaning and addressing small smudges as they appear can extend the time between full, deep cleans.
Ultimately, treating your running shoes with care is an investment in your performance, comfort, and injury prevention. A clean shoe isn’t just about aesthetics; it’s about maintaining the integrity of the tool that carries you through every mile. By avoiding the destructive temptations of the washer and dryer and embracing a simple, gentle hand-washing routine, you ensure that your shoes will support you reliably for their entire intended lifespan.