For Miami’s fitness enthusiasts aiming to build a powerful, sculpted physique, the humble push-up is the ultimate, non-negotiable tool. This foundational bodyweight movement, which can be performed anywhere from a high-rise balcony overlooking Biscayne Bay to the sandy shores of South Beach, is the key to developing formidable upper-body strength, a chiseled chest, and rock-solid core stability. Mastering the push-up isn’t just about cranking out high numbers; it’s about understanding the biomechanics, embracing perfect form, and strategically progressing the exercise to continuously challenge your muscles and achieve the aesthetic and functional strength that defines a healthy, active lifestyle.
Why the Push-Up Reigns Supreme in Bodyweight Training
In a world of complex gym equipment and trendy fitness classes, the push-up remains an undisputed king. Its effectiveness lies in its simplicity and its profound impact on the human body. It is a closed-chain kinetic exercise, meaning your hands are fixed in one spot while your body moves, which is excellent for building joint stability, particularly in the shoulders, elbows, and wrists.
The push-up is a compound movement, which means it engages multiple muscle groups across several joints simultaneously. With every single repetition, you are activating your pectoralis major and minor (chest), deltoids (shoulders), triceps (back of the arms), serratus anterior (the muscles wrapped around your rib cage), and the entire core, including the rectus abdominis and obliques. This multi-muscle activation makes it an incredibly efficient exercise for building strength and burning calories.
Beyond aesthetics, this movement builds immense functional strength. The pushing pattern directly translates to everyday activities, from pushing a heavy door open to lifting luggage into an overhead bin or simply getting up off the floor. For those who enjoy an active Miami lifestyle—be it paddleboarding, beach volleyball, or cycling—the core stability and upper-body power developed through push-ups provide a robust foundation for improved performance and injury prevention.
Perhaps its greatest advantage is its accessibility. It requires no membership, no equipment, and no special location. It is a democratic exercise, available to everyone, everywhere, making it the perfect addition to any workout routine, whether you’re at home, traveling, or taking your fitness outdoors to one of the city’s many beautiful parks.
Anatomy of a Perfect Push-Up: A Step-by-Step Breakdown
Executing a push-up with flawless form is the difference between building muscle and risking injury. Each phase of the movement requires focus and intention. Breaking it down into distinct steps ensures you maximize the benefits while safeguarding your joints.
The Setup: Your Foundation
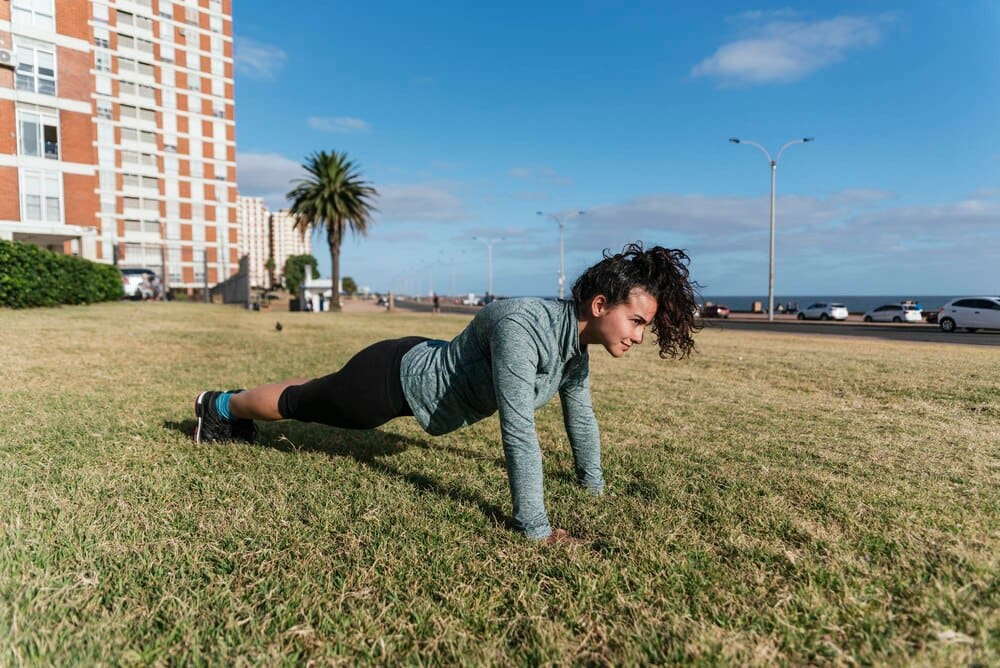
Begin in a high plank position. Place your hands firmly on the floor directly beneath or slightly wider than your shoulders. Your fingers should be spread comfortably and pointing forward or slightly outward to promote external rotation at the shoulder, which helps protect the joint.
Your body must form a completely straight line from the crown of your head to your heels. Avoid piking your hips up toward the ceiling or letting them sag toward the floor. Engage your core by bracing your abdominal muscles as if you’re about to take a punch to the gut. Squeeze your glutes and quads to create full-body tension. This rigid, plank-like posture is non-negotiable and must be maintained throughout the entire set.
The Descent: The Eccentric Phase
The lowering portion of the push-up, known as the eccentric phase, is where much of the muscle-building stimulus occurs. Initiate the movement by bending your elbows, allowing your torso to descend toward the floor in a controlled manner. Do not let gravity do the work for you; resist it on the way down.
Your elbows should track backward at roughly a 45 to 60-degree angle from your body. Avoid flaring your elbows out to the sides at 90 degrees, as this places excessive strain on the shoulder joint’s delicate structures. Continue lowering yourself until your chest is just an inch or two from the ground, ensuring your straight body line remains intact.
The Ascent: The Concentric Phase
This is the “push” part of the push-up. From the bottom position, press through the palms of your hands to powerfully drive your body back up to the starting plank position. The force should be explosive but controlled.
Focus on pushing the floor away from you. As you ascend, maintain that rigid core and straight line from head to heels. The movement should be cohesive, with your chest, hips, and head all rising at the same rate. Finish the repetition by fully extending your elbows at the top without hyperextending them.
Common Push-Up Mistakes and How to Fix Them
Even seasoned gym-goers can fall into bad habits. Identifying and correcting common form errors is essential for progress and safety.
The Sagging Hips
One of the most frequent mistakes is allowing the hips to drop, creating a sway in the lower back. This is a clear sign of a disengaged or weak core. It not only reduces the effectiveness of the exercise on your chest and arms but also puts your lumbar spine at risk.
The Fix: Before you even begin your descent, consciously squeeze your glutes and brace your abdominals. Imagine pulling your belly button in toward your spine. This creates the tension needed to keep your torso and lower body locked in a straight line.
The Flared Elbows
When the elbows flare out wide to the sides, it internally rotates the shoulder joint, which can lead to shoulder impingement and pain over time. This form often feels easier initially but compromises the health of your shoulder capsule.
The Fix: Think about creating an “arrow” shape with your body, not a “T.” Actively tuck your elbows so they point back at a 45-degree angle. This engages your lats for stability and puts the shoulder in a safer, stronger position.
The “Worm”
The “worm” occurs when your upper body rises before your hips during the ascent, creating an unflattering and inefficient wave-like motion. This happens when your core and lower body can’t keep up with the force generated by your chest and arms, indicating a breakdown in full-body tension.
The Fix: This is a sign that you have reached muscular failure with good form. Instead of continuing with poor technique, end your set. To build the requisite strength, regress to an easier variation, such as an incline or knee push-up, where you can maintain a rigid body line.
Your Push-Up Progression Plan: From Beginner to Pro
The beauty of the push-up lies in its scalability. No matter your starting point, there is a variation that will challenge you appropriately.
Level 1: Building the Foundation
If a standard push-up is currently out of reach, start with regressions that build foundational strength. Begin with Wall Push-Ups, standing a few feet from a wall and pressing against it. Progress to Incline Push-Ups by placing your hands on an elevated surface like a park bench, box, or staircase. The higher the incline, the easier the exercise. You can also perform Knee Push-Ups, ensuring you maintain a straight line from your head to your knees.
Level 2: Mastering the Standard
Once you can comfortably perform several sets of incline or knee push-ups with perfect form, it’s time to tackle the Standard Push-Up on the floor. At this stage, your goal is not just to do one, but to build volume. Focus on accumulating reps with pristine technique, aiming for sets of 8-12 repetitions before considering more advanced variations.
Level 3: Advanced Variations for a New Challenge
When you’ve mastered the standard push-up, you can introduce new variations to target different muscles and increase the difficulty. Decline Push-Ups, with your feet elevated, place more emphasis on the upper chest and shoulders. Diamond Push-Ups, with your hands close together forming a diamond shape, are a killer exercise for the triceps. For a true test of strength and stability, try Archer Push-Ups, where you shift your weight to one side at a time, building unilateral power.
Integrating Push-Ups into Your Miami Workout Routine
Incorporate this powerful exercise into your existing fitness plan to maximize results. For those who love outdoor workouts, create a circuit at a place like Muscle Beach South Beach. Perform a set of push-ups to failure, followed immediately by pull-ups on the bars, walking lunges along the path, and a short sprint.
If you prefer high-intensity training, use push-ups as a key station in a HIIT workout. Try a Tabata protocol: 20 seconds of maximum-effort push-ups followed by 10 seconds of rest, repeated for eight rounds. This will skyrocket your heart rate and build incredible muscular endurance.
In a traditional gym setting, use push-ups as a “finisher” at the end of your chest or full-body workout. After your main lifts, drop to the floor and perform as many perfect push-ups as possible to completely fatigue the muscle fibers and stimulate new growth.
Ultimately, the push-up is more than just an exercise; it’s a measure of relative strength and a testament to dedication. By focusing on perfect form, patiently progressing through its many variations, and integrating it consistently into your routine, you are building a physique that is not only aesthetically pleasing but also functionally powerful and resilient. It is the timeless key to unlocking your strength potential, one perfect repetition at a time.